
Navigation
In the ever-evolving world of network administration, one cannot underestimate the power of mastering specific tools and protocols that simplify one's daily tasks. One such highly influential, yet often misunderstood, protocol is the Preboot eXecution Environment, or PXE Boot. As the cornerstone of network booting, PXE Boot allows computers to load an operating system over a network connection before booting the local storage devices. Understanding, let alone mastering this technology, can be a complex endeavor due to its intricacies and nuances.
That's where this comprehensive guide comes into play. Getting a firm grasp on the PXE Boot process can do wonders by streamlining systems deployment and increasing efficient network management. So, whether you're an expert looking for a refresher or a novice eager to delve into the world of network booting, this guide will serve as a reliable roadmap. With a focus on practical, hands-on insights, we venture deep into the world of PXE Boot, equipping you with the knowledge and skills to navigate its landscape with confidence. Let's jump-start this journey and boot up your system to the promising world of network management.
What is PXE Boot?
PXE (Preboot eXecution Environment) Boot is a protocol that provides a framework to allow a machine to boot its operating system from a network server rather than a local hard drive or other bootable media. In essence, it empowers the computer system to download the necessary booting files from a network location.
Cable Matters Ethernet adapters support PXE Boot by providing reliable, high-speed connections for efficient boot file transmission.
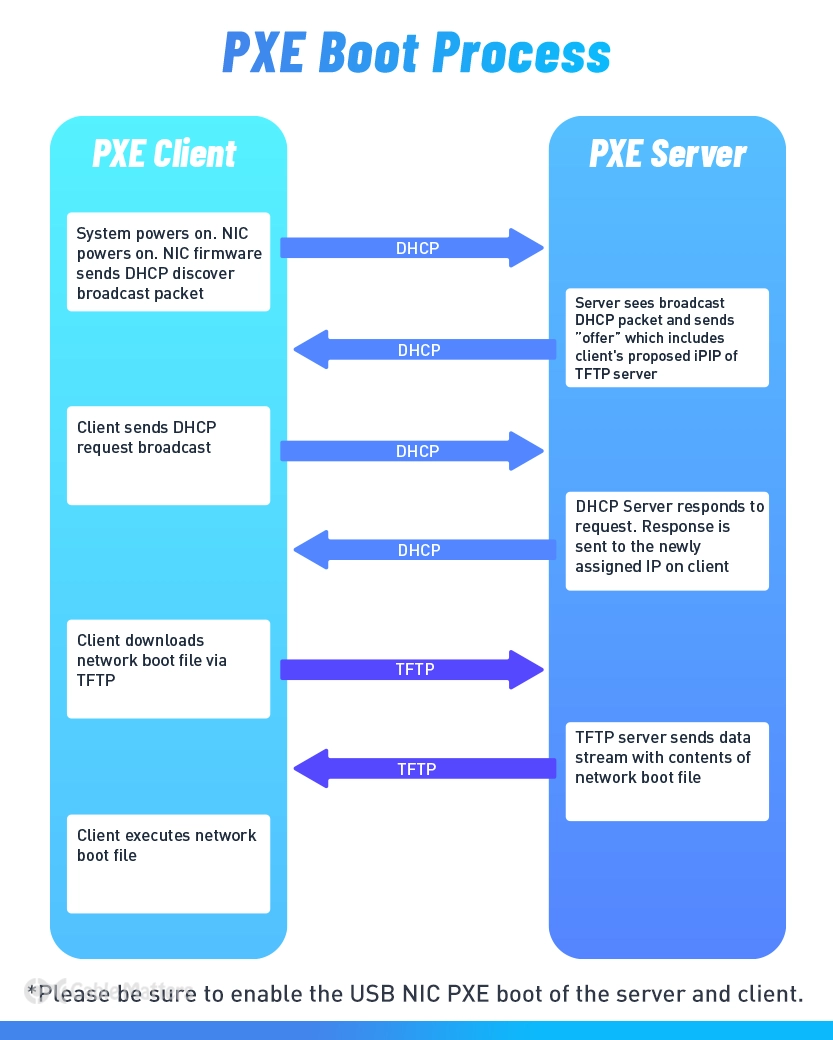
PXE Boot employs a series of network protocols and components working in coherence to initiate the boot-up process. The client machine, a DHCP server, and a TFTP server are key components.
PXE Boot initiates with the client machine's BIOS configured to boot via the network. The client sends a broadcast packet (DHCPDISCOVER) to the network. In response, a DHCP server provides a DHCPOFFER packet, which includes an IP address for the client and additional boot parameters.
Key parameters include Option 66 and Option 67. Option 66 gives the client the TFTP server's IP address (where the boot files are stored) and Option 67 provides the boot file's name.
The client then connects to the TFTP server using the provided IP address, requests the specified boot file, and upon successful download, the operating system loading begins.
The TFTP (Trivial File Transfer Protocol) server then supplies the required boot files (as specified by the DHCP server) to the client machine, initiating the boot-up sequence. The TFTP server primarily utilizes the UNDI (Universal Network Device Interface) driver, enabling the client machine to interact with the server on a network protocol level.
Combining these mechanisms results in the PXE Boot process, which uses established network protocols (like DHCP and TFTP) and an intelligent combination of BIOS settings and network interoperability standards (like UNDI) to enable network booting.
How Does PXE Boot Work?
The PXE Boot process operates in several steps, involving interactions between various components such as the client machine, the DHCP server, and the TFTP server.
Step 1: PXE Initiation
The process begins when a client machine is powered on and its BIOS is set to boot from the network. It initiates the PXE code stored in its firmware.
Step 2: DHCP Discovery
The client sends a network broadcast (DHCPDISCOVER) looking for a DHCP server.
Step 3: DHCP Offer
A DHCP server responds with a DHCPOFFER packet, providing the client an IP address and other network parameters. Crucial boot parameters, Option 66 and Option 67 provide the client with the TFTP server's address and the boot file's name respectively.
Step 4: TFTP Connection
Using the information from the DHCP server, the client then establishes a connection with the TFTP server and requests the boot file specified in Option 67.
Step 5: Boot File Download
The TFTP server sends the boot file (typically a Network Boot Program or NBP) to the client machine, which is loaded into the client's memory.
Step 6: Operating System Boot
The client machine starts executing the downloaded boot file, beginning the operating system boot process. It can communicate with the TFTP server to download more files or with an installation server for image installation as per the boot file instructions.
The boot files and Network Boot Program are crucial in this process. The NBP is the first file that the client downloads from the TFTP server. It includes instructions about where and how to download the operating system. As such, NBP is the sled dog that guides the client machine through the snowy landscape of network booting to its destination - a successfully booted operating system.
In support of the PXE Boot process, Cable Matters Ethernet adapters stand out as they provide robust and reliable network connectivity. These adapters enhance the efficiency of the PXE Boot by providing high-speed connections, crucial for the seamless transfer of boot files from the TFTP server to the client machine. The compatibility of Cable Matters Ethernet adapters with PXE Boot contributes to a more responsive, reliable, and efficient network booting process.
How To Setup a PXE Boot System
To set up a PXE Boot system, follow this 5-step procedure:
Step 1: Configure DHCP Server
Install and configure your DHCP server if you haven't already. Make sure your DHCP server is authorized and operational in your network. Modify your DHCP server configuration, adding options 66 and 67. Option 66 specifies the boot server's address, while Option 67 denotes the initial boot file's name.
Step 2: Set Up TFTP Server
Install a TFTP server on your designated boot server machine. Ensure it's accessible over your network and stable. Configure the TFTP server settings, such as proper permissions and security measures. Specify the root directory where the boot files will be stored.
Step 3: Configure Boot Files
Download PXELINUX, a Syslinux project component that enables network booting. Extract the necessary files (such as pxelinux.0 and ldlinux.c32) from the PXELINUX download into your TFTP server's root directory. Create a pxelinux.cfg directory at the root level of your TFTP server to store the system's configuration files. Develop a default configuration file named default (without a file extension) inside the pxelinux.cfg directory. Configure it according to your requirements, specifying the desired options, such as the kernel, initial ramdisk, and any required kernel parameters.
Step 4: Add Operating System Images
Obtain the OS images you intend to deploy over the network. Copy the necessary kernel and initial ramdisk files from the downloaded images to your TFTP server's root directory or an appropriate subdirectory. Update your PXELINUX configuration file to include the recently added OS images, specifying the correct paths and options.
Step 5: Configure Client Machines
Access the BIOS settings on each client machine, enabling "Network Boot" or "PXE Boot" in the boot order. Save the changes and restart the machines. As the machines boot, they should now access the PXE Boot server, load the menu from the configuration file, and allow you to choose the desired OS image for installation.
With these steps, you will have successfully set up a PXE Boot system, allowing you to deploy operating systems or perform maintenance tasks over your network efficiently.
For an in-depth guide directly from the Cable Matters Quality Engineers on How To Start a Windows PE System via UEFI PXE IPv4 with Cable Matters Ethernet adapters, click here.
Advantages of PXE Boot
As an experienced IT professional managing a complex network system, it becomes essential to understand that leveraging the PXE Boot functionality presents numerous benefits in terms of efficiency, flexibility, and speed. Here, we will discuss the top three ways you can use PXE Boot in a dynamic IT environment.
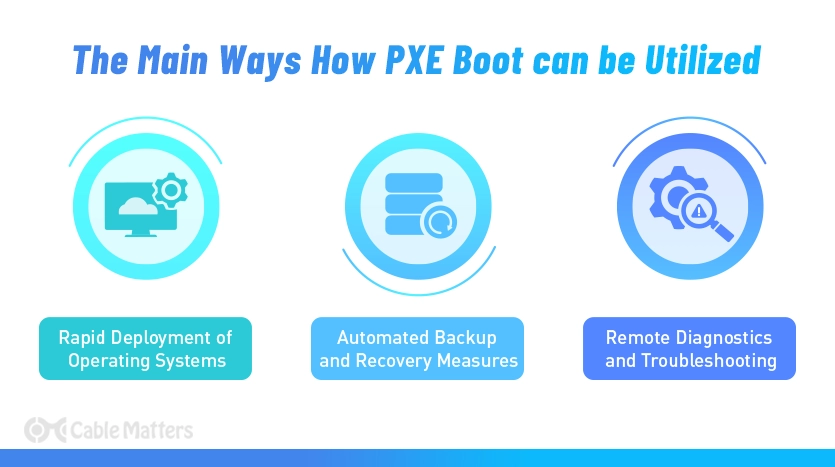
Rapid Deployment of Operating Systems
One of the most powerful applications of PXE Boot lies in the rapid and simplified deployment of operating systems to multiple machines. Should you need to deploy a new Windows or Linux distribution across the entire organization or specific groups, PXE Boot would be the ideal solution. By setting up and configuring a PXE Boot server, the required OS images will be accessible for network booting. Throughout this process, new systems can be added effortlessly to the network without needing any local image installation, significantly reducing hands-on management time and effort. Moreover, a designated boot server eliminates the requirement for physical media, making OS deployment faster and more environmentally friendly.
Automated Backup and Recovery Measures
PXE Boot also aids in implementing disaster recovery measures and automated backup solutions across the network. Without the need for user intervention or local environment configurations, establish a centralized Backup and Disaster Recovery (BDR) solution, allowing network administrators to power it on and boot the machines using the PXE Boot process. Consequently, baselines for regular automated backups can be implemented, safeguarding essential organizational data. In the event of a critical system failure or viral attack, these backups can be restored swiftly through PXE Boot, minimizing downtime and ensuring business continuity.
Remote Diagnostics and Troubleshooting
Issues may arise in different locations in a complex network system, necessitating prompt resolution and diagnostics. With PXE Boot, it becomes possible to troubleshoot and diagnose remote systems without requiring local access. By booting the systems using a dedicated diagnostic image, extensive system tests and health checks can be executed to identify potential hardware and software issues. Coupling PXE Booting with remote-management technologies like Intel vPro and Wake-On-LAN enables remote diagnosis and troubleshooting, rendering on-site visits unnecessary and significantly reducing costs.
In conclusion, employing PXE Boot in a dynamic IT environment demonstrates increased efficiency, improved disaster recovery measures, and unparalleled convenience for remote diagnostics and troubleshooting in a complex network system.
Best Practices for an Efficient PXE Boot Environment
Network Segmentation and Optimization
Designing the network with proper segmentation can reduce latency and improve the speed of PXE Boot operations. It's advisable to implement VLANs (Virtual Local Area Networks) to minimize broadcast traffic and maintain efficiency during the boot process. It is also important to ensure that the DHCP and TFTP servers are configured optimally and robust enough to handle the network traffic during peak boot times.
Security Considerations
Security is crucial even during the boot process. It's essential to protect the TFTP server and the boot files it hosts. Unauthorized access can lead to grave security incidents. Using IP and MAC address filtering, deploying firewalls between different network segments, and regularly auditing access logs will enhance security.
Regular Maintenance and Update of Boot Images
Keep the boot images up-to-date. Any necessary patches, updates, or changes in configuration should be reflected in the boot images stored on the TFTP server. Doing so reduces potential conflicts or compatibility issues during the boot process.
Maintaining Clear Documentation and Configurations
Comprehensive documentation of the PXE Boot process and a clear record of configurations are invaluable for troubleshooting and maintenance. It includes noting down the details of DHCP options, network paths of boot files, versions of NBPs, and any custom configurations applied. These records prove to be a time-saving resource in keeping the network boot operations streamlined and efficient.
Following these best practices enhances the reliability, security, and efficiency of the PXE Boot environment, making it a sturdy backbone for network management and system deployment.
Conclusion
We have covered the fundamental aspects of PXE Boot in this blog post. We've explored what PXE Boot is, the key components and protocols it involves, and detailed how it functions step-by-step. We also highlighted the importance of boot files and the Network Boot Program (NBP) in the PXE boot process.
A standout point to note is the support offered by Cable Matters Ethernet adapters to the PXE Boot process. By ensuring rapid, reliable network connectivity, these adapters are instrumental in the efficient transmission of boot files, thus aiding in successful and swift system booting over the network.
PXE Boot is a powerful tool for managing and deploying network systems. Its ability to boot systems over the network helps save significant time and resources in day-to-day network administration, making it a critical asset for tech professionals.
For those interested to venture further and build upon this foundational knowledge, online platforms such as Microsoft TechNet and the Intel Developer Zone offer more advanced topics and comprehensive guides on PXE Boot and related technologies. Other resources can include tech forums, professional networking groups, and industry-led webinars. You may reach out to us directly here at Cable Matters too, and we will be happy to answer any questions you have.
The advantages of PXE Boot suggest a strong incentive for its implementation in network management. We hope this exploration provided you with the necessary insights to comprehend and consider employing PXE Boot in your IT infrastructure. Happy networking!
FAQ
What is PXE Boot?
Preboot eXecution Environment (PXE) Boot is a protocol that allows a computer to boot its operating system from a server via a network, instead of from a local hard drive or a disk.
What are the main components of PXE Boot?
The primary components involved in a PXE Boot process are the client machine, the DHCP (Dynamic Host Configuration Protocol) server, and the TFTP (Trivial File Transfer Protocol) server.
What are DHCP options 66 and 67?
These are essential boot parameters provided by the DHCP server during the PXE Boot process. Option 66 points to the IP address of the TFTP server where the boot files reside, while Option 67 denotes the name of the boot file that the client needs to request from the TFTP server.
How can I secure my PXE Boot environment?
You can enhance security by protecting the TFTP server, using IP and MAC address filters, applying firewalls between different network segments, and regularly auditing the access logs. Always ensure the boot files are securely hosted.
Why does my PXE Boot environment need regular maintenance?
Maintaining and updating boot images regularly ensures any new patches, updates, or configuration changes are reflected in the boot images on the TFTP server. This prevents potential conflicts or compatibility issues during the boot process, ensuring a smoother and more effective network boot operation.