Navigation
Wiring your own keystone jacks can be a great way to maintain your network connections in the exact manner of your choosing. If you have to do a lot of work with patch panels and wall-mounted Ethernet connections, it can save you a lot of money too.
Learning how to wire keystone jacks takes a little time and practice though. You need the right tools, and you need the right cables for the job. For a breakdown of what you need and how to use it, follow along with our guide on how to wire a keystone jack, and before long, you’ll be able to manage and configure your keystone patch panels exactly how you want them.
Tools You’ll Need To Wire a Keystone Jack
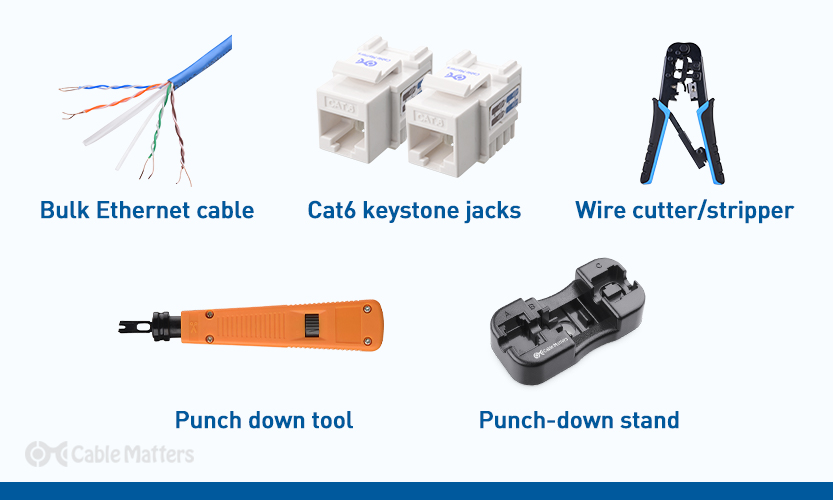
To wire a keystone jack yourself, you’re going to need a few important tools. The first and foremost is the cable and the keystone jack itself, but there are a range of options there so you’ll need to pick the ones that are most suitable for what kind of patch panel or wall-mounted Ethernet panel you want to build.
Some options include Cable Matters bulk Cat6 Ethernet Cabling, though it’s available in a range of lengths, colors, and speeds, with different ratings and shielding options depending on your needs. For keystone jacks, Cable Matters offers a range of RJ45 jack packs, from smaller 10-packs to much more cost-effective 50-packs.
Just be sure that you buy the kind of keystone jacks that match the category of cable you plan to use, be it Cat 5e, Cat 6, Cat 6a, or even Cat 8, and that they come with keystone punch-down stands. Some keystone jacks are designed for termination, or gender swapping a cable type, so wouldn’t be viable for wiring yourself.
As for the actual tools you need to begin wiring your own keystone jacks, you’ll need the following:
Other tools or accessories worth considering if you don’t have them already, is a modular patch panel or wall mount. Make sure when picking a patch panel that it mounts to your rack configuration or wall mount measurements. Also, make sure it is large enough to cater to the number of cables you ultimately want to wire into your keystone jacks.
If you plan to use your bulk patch cabling to make your own Ethernet cables, you will also want to invest in a crimp tool, a pack of RJ45 modular plugs, and a set of strain relief boots.
How To Wire A Keystone Jack
Once you have all your tools and cables in hand, you’ll be able to start the process of wiring your keystone jacks. You’ll want to clear a workspace that’s free of clutter and spill hazards and place all of your tools within easy reach, before beginning.
Note: This method works much the same for both 90-degree and 180-degree keystone jacks. A 180-degree jack simply gives you more options for how you orient your writing.
Take your bulk patch cable, and using the wire cutter, strip the protective rubber coating of the cable an inch or two from the end to reveal the various twisted pairs inside. If your patch cable has an internal spline, cut it at the point the rubber coating terminates to make it easier to manipulate the wires. Be careful not to damage the internal wiring when doing so.
Separate the twisted pairs into their respective colors, and untwist them so that they can be wired into the keystone jack separately.
Take one of your keystone jacks and, if you have a punch-down stand, place it in the stand to hold it in place. Alternatively, simply hold it firmly in your other hand before continuing.
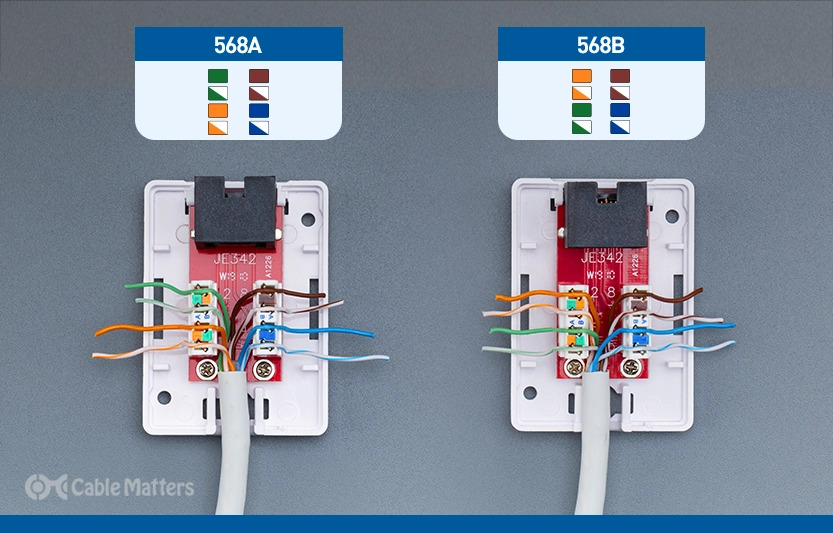
Note: There are different wiring schemes you can opt for when wiring a keystone jack, but T568B is the most common. If you’re in doubt about which to use or where the wires should go, simply refer to the side of any Cable Matters keystone jack. They all include color-coded wiring guides to make the process easier.
If at any point you are concerned that the wires might come loose, you can use the non-bladed side of your punch-down tool to give them a slightly harder press into the keystone jack. Don’t punch them down just yet, but that extra push can help them remain sturdily in place while you finish laying down the other wires.
Once you’ve laid all the wires in position and are happy with the layout, it’s time to punch them down. To do so, take the punch-down tool in one hand and hold either the keystone jack, or the punch-down stand firmly in your other hand, and push it down on top of each of the wires in turn. This will fix the wires into the keystone jack so that they are immovable, and provide an active contact for the keystone jack to utilize.
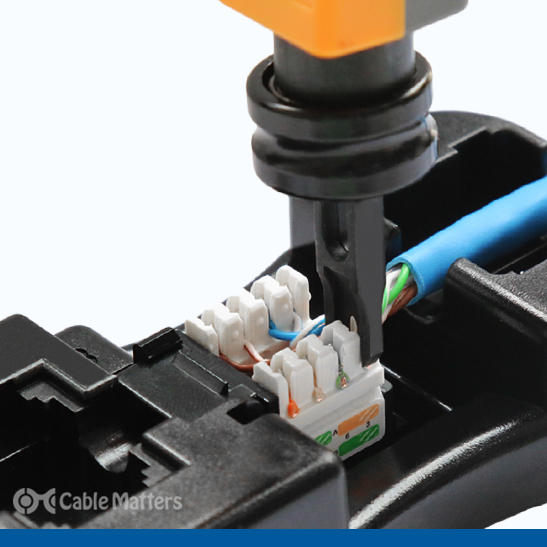
The punch-down tool should also have cut off any excess wires that were overhanging the keystone jack. If not, use your wire cutter or another cutting tool to remove the excess. If any of the wires don’t look like they’re adequately punched down, use the punch-down tool a second time to firmly secure them in the keystone jack.
Once you’re happy with how everything looks, push the keystone jack’s dust cap(s) into place. You should hear a snap once they’re locked in, preventing the wiring from coming dislodged.
You can then place your newly wired keystone jack into your patch panel or wall mount and test it out, or move on to your next keystone jack. Repeat the process as necessary for however many keystone jacks you need to wire.
The process to terminate a modular plug is similar.
Push the patch cable up to the opening of the plug, but don’t surpass it, then begin inserting the wires into the plug as designated by your wiring scheme. If you do use the T568B scheme, then the order should be as follows:
- Orange stripe
- Orange
- Green Stripe
- Blue
- Blue stripe
- Green
- Brown stripe
- Brown

Discover Keystone Jacks by Cable Matters
Cable Matters offers a wide range of keystone jacks, designed for RJ45 Ethernet connections, coaxial inputs, and fiber optics. RJ45 keystone jacks are the most versatile, and popular, however, and come in a range of category certifications, with different color options, and shielding ratings.
The most affordable keystone jacks that Cable Matters has in its catalog, is a 10-pack of Cat6 RJ45 keystone jacks that come in white, blue, or black. They feature the same high-performance Cat 6-rated wiring and are compatible with 23 and 24-AWG gauge wiring. They can be wired in either the T568a or T568b wiring schemes, with color coding for both on each keystone jack to make it easy.
They also enjoy gold-plated, anti-corrosion contacts, are made with impact-resistant plastic, and have strain-relief dual IDC covers. They’re compatible with keystone jack panels, wall plates, and surface mount boxes, and at just $16 for 10, are incredibly cost-effective.
If you’re working with larger patch panels, or expect the need to expand what you have in the future, Cable Matters also offers 25-packs of those same Cat 6 RJ45 keystone jacks. Available in the same color options, with the same features, these keystone jacks also come with their punch-down stand, making the process of wiring your keystone jacks easier, and more cost-effective.
Building a slimline patch panel? Cable Matters has slim profile keystone jacks for them too. They’re around 8% slimmer than standard keystone jacks but are still compatible with standard Cat 6 decorator-style wall plates.
Other options include higher-performing keystone jacks, like these shielded RJ45 Cat 8 keystone jacks. These are future-proofed and ready for network speeds anywhere up to 40 Gigabit per second and are backward compatible with Cat 6A, Cat 6, and Cat 5e cables. As 180-degree jacks, they’re simple to install termination blocks in, and with a full metal housing, they offer the pinnacle in electronic shielding and physical protection for your cabling.
Other keystone jacks and patch panel accessories worth considering for your personal or professional wiring project include Blank keystone jack inserts for walling off portions of your patch panels; gender-changing keystone jacks for converting male to female connections, or vice versa; HDMI, coaxial, Toslink, or fiber optic keystone jacks for a range of patch panel connection options, and even banana jack binding posts, for fitting speaker wiring in the wall for a more professional, hidden installation.
Cable Matters has all the hardware, accessories, and tools you need for whatever kind of wiring project you have planned, so be sure to explore our ranges of patch panels and wall mounts too, when it comes to planning your particular project.
Conclusion
Mastering the skill of wiring your own keystone jacks can be a noteworthy asset in managing your network connections, especially when they need personal customization, frequent alterations, or when you're working on a larger network project. When you foray into this technically intricate territory, not only do you acquire a unique skill, but you could potentially save a significant amount of money and time which would otherwise be spent on technicians.
Learning to wire a keystone jack requires patience and a keen eye for detail. Beginners might find the task slightly challenging but remember, practice invariably makes perfect. It's a continuous process of learning and improving, and the more you immerse yourself in it, the more adept you will become.
Our comprehensive "How to Wire a Keystone Jack" guide illustrates each step in the process, ensuring you can perform the task accurately and confidently. From selecting the right cables and keystone jacks, to strategically placing each wire according to the correct scheme, we've covered all the essential details to assist your journey.
The Cable Matters range of products proves invaluable in ensuring you have the requisite materials required for the job. The variety of their offerings, from bulk Cat6 Ethernet Cabling to a range of RJ45 jack packs, allows for myriad options based on individual needs, thus making the process even more flexible and adaptable. With the right tools in your kit, such as a wire cutter/stripper, a punch-down tool, and optionally, a punch-down stand, the process of wiring becomes considerably less intimidating.
Upon successful completion of this task, the satisfaction derived is unmatched. You will have created a network custom-tailored to your needs, perfectly fitting your particular project requirements. The keystone jacks you wire can be easily integrated into your existing setup, whether it's in a patch panel or wall mount.
In conclusion, wiring a keystone jack paves the way toward a more personalized configuration of your network setup. Embrace the process with patience and precision. With a bit of practice and the support of Cable Matters products, this experience can be straightforward, rewarding, and a great addition to your technical skillset. Your network will benefit from the precision of your hands and the understanding of your mind, ensuring a resilient and custom-built connection suited to your specific requirements.
FAQ
Is it difficult to wire a keystone jack?
Wiring a keystone jack requires attention to detail and a bit of practice, but it's not inherently difficult. With the right tools and following the proper wiring scheme, most users can learn to do it effectively.
What's the difference between T568A and T568B wiring?
T568A and T568B are two different wiring schemes standardized by ANSI/TIA/EIA for wiring Ethernet cables. They are essentially the same in functionality, and the difference is in the pin-out configuration. T568B is the most commonly used in the United States.
Do I need to buy a special tool to wire a keystone jack?
Yes, you'll need a punch-down tool. While there are devices that can hold the wires in place, nothing replaces the security of a properly punched-down connection.
Can I mix and match different categories of Ethernet cables and keystone jacks?
Keystone jacks are often backward compatible, but for optimal performance, match the category of your cable with your keystone jacks. For example, use Cat 6 cables with Cat 6 keystone jacks.
Should I be worried about cable length affecting performance?
Yes, the maximum length for a run of Ethernet cable (Cat 5e or Cat 6) is 100 meters (328 feet) to maintain the standard performance. Going beyond this length without a repeater can lead to signal degradation.
Can I wire a keystone jack without a punch-down stand?
Yes, you can wire a keystone jack without a punch-down stand, but using a stand can make the process easier and more stable.
Explore Cable Matters’ comprehensive range of products and accessories to find the perfect fit for your networking project, and approach your wiring with confidence.